skip to content

DO IT YOURSELF LICE REMOVAL KIT

We’re here for you even if you are treating at home

The Lice Clinics of America Lice Removal Kit and Urgent Care Kit have everything you need to safely and effectively eliminate lice and their eggs and keep them away! The most time consuming and important step in the do-it-yourself process is the combing. Combing each small section of hair will take several passes to assure EVERY nit (lice egg) is removed. Depending on the texture and length of hair, combing takes the average person 2-5 hours.

COMING SOON!

Lice Removal Kit

If you have the Lice Removal Kit proceed to the below steps below.

STEP 1: Prepare

We recommend lice removal should be performed in the kitchen or bathroom for easy clean up.

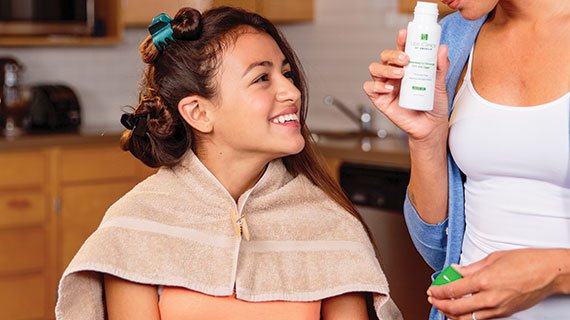
  • Place your family member on a stool in a very well lit area. You may need to use an additional lamp since lice eggs are tiny and often blend in to the hair color.
  • Wrap a towel over the family member’s shoulders.
  • You will need paper towels, a large bowl of warm water or a nearby sink, hair clips big enough for a large section of hair and a comb to part the hair.
STEP 2: The Easy Rinse Formula

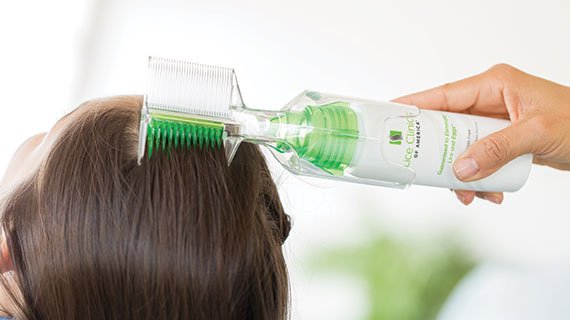
Apply the easy rinse liquid gel to dry hair only. Attach the dispenser to the bottle, turn it upside down and squeeze the bottle. Liquid gel will appear on the green teeth of the dispenser. Rake it into the hair nearest the scalp, wetting the hair completely with the liquid gel.

STEP 3: Distribute Evenly Through Hair

Continue to use the green side of the dispenser to apply formula and rake it into the hair. Move from one small section of hair to the next, only using the green side of the dispenser. Once the hair is saturated, allow the liquid gel to sit in the hair for ten minutes.

STEP 4: Begin Lice and Egg Removal

Use the clear side of the dispenser to remove lice, eggs, and excess liquid gel from the hair. Be sure to pull the comb all the way through to the ends of the hair.

STEP 5: Finish Lice and Egg Removal

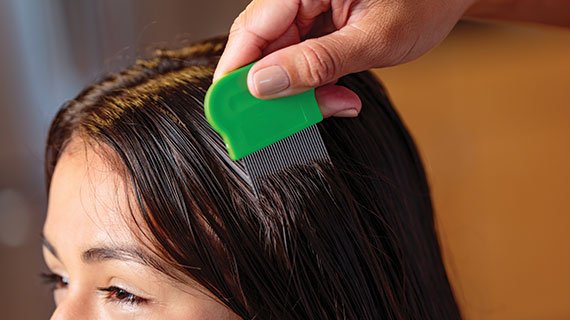
Use the metal lice comb and begin to comb the remaining lice, eggs, and excess liquid gel out of the hair. Pull the comb through the full length of hair and wipe the comb on a towel after each pass.

STEP 6: Clean Up

Your child should now be lice free! Carefully remove the towel from around the neck, realizing there may be live lice on it. Use a lint brush to remove any debris from your child’s clothing and then remove. Wash towel and clothes on hot, dry on high. Carefully sweep or vacuum any debris on the floor. Any tools, combs or brushes you are not throwing away should be placed in a zipped bag and into the freezer for 48 hours. Keep the dispenser and comb to repeat this process 10 days later.

STEP 7: The follow-up

There is enough formula to repeat the process ten days after the initial treatment or anytime within ten days of the initial treatment that you see active lice. The second treatment is necessary and is your best guarantee for success.

I Hate Lice Kit

If you have the I Hate Lice Kit proceed to the below steps below.

STEP 1: Prepare

We recommend lice removal should be performed in the kitchen or bathroom for easy clean up.

  • Place your family member on a stool in a very well lit area. You may need to use an additional lamp since lice eggs are tiny and often blend in to the hair color.
  • Wrap a towel over the family member’s shoulders.
  • You will need paper towels, a large bowl of warm water or a nearby sink, hair clips big enough for a large section of hair and a comb to part the hair.
STEP 2: The Active Rinse

You will start by generously applying 2-3 ounces of the Lice Clinics of America® Active Rinse to dry hair and massaging until hair is completely wet. Then, waiting 10 minutes and washing it out with dish soap.

STEP 3: The Comb-Out Mousse

Part the damp hair into 4 sections. Working a section at a time, apply a few pumps of Lice Clinics of America® Comb-Out Mousse and massage it thoroughly into hair.

STEP 4: Combing

Starting at the scalp, you would run the Lice Clinics of America® Comb the full length of hair, then wipe it on a clean paper towel after every pass. Continue combing that section of hair until the lice comb wipes clean.

STEP 5: Clean Up

Your child should now be lice free! Carefully remove the towel from around the neck, realizing there may be live lice on it. Use a lint brush to remove any debris from your child’s clothing and then remove. Wash towel and clothes on hot, dry on high. Carefully sweep or vacuum any debris on the floor. Any tools, combs or brushes you are not throwing away should be placed in a zipped bag and into the freezer for 48 hours. We recommend that you do not throw away the lice comb because you will need it for step 6.

STEP 6: The follow-up

You or one of our clinic professionals should check every member of the household for lice 7-10 days later. If you see lice (they will be very small and newly hatched), repeat step 1-4.

Copyright © 2016 - 2024 Lice Clinics of Ireland. All rights reserved.